Friday, February 28, 2014

Confetti

Happy Friday my special peeps!  Hope your week has been a good one.  I've had a mix of home days and work days this week, all of them good.  Plus we've had some great rain here, and even a thunderstorm! Exciting. 

spring
 
I've had some fun playing around with an idea.  Took a few minutes to cut out some fusible applique letters and shapes.  I'm hoping that it turns out as cute in real life as it seems in my head.   After running some errands I scooped up my little  mother, it was her birthday yesterday, and brought her over for some dinner and cake!  I ended up making  angel food cake, selfishly my favorite.  She couldn't decide what she wanted.  Back in the day I always had angel food cake on my birthday... only not the plain kind, the 'confetti' kind, which was angel food cake with sprinkles cooked in it so it was polka dotted. Came packaged in a mix, with the separate little sprinkles, like you couldn't just do it on your own.

Cake_AngelFood-Confetti_Detail_300x406
 
WHAT THE WHAT???? THEY STILL MAKE IT!!! I was hoping that I'd at least find some old 60's graphics and found this!!!   Wow. I'll be on the lookout now.  Holy cow. 

Ok, back to the studio today. IT'S ALMOST MARCH.  Yowsers.  Have a good weekend everyone! xo


Wednesday, February 26, 2014

Wednesday

Good morning!  Thanks for all the nice comments on the Charm Pack Cherry Quilt!  I had a lot of fun doing it and I'm always excited to participate in a project like that!  I loved how they all look so different. Wouldn't it be a fun thing to kit up out of scraps? I like to cut myself kits to work on.  Or kits for a gift. 

coffee
 
I have been working away with Holly.. it's so inspiring to work with her, she has so many ideas bubbling up out of her. Being in a creative environment has really jump-started that creative urge in me. I've  finished up cutting all the sashing on my Liberty Road Quilt so as soon as I have time to sit down and sew, I can finish that up.  The blocks are so cute!
 
Isn't my new mug a crackup?   My friend Carrie sent it to me along with a back up Keep Calm and Carry On mug.  She totally gets me.  Do you follow her on Instagram?  She shows works in progress at an alarming rate.
 
Ok, off to work. Although to be honest it seems wrong to call something so fun work.  Have a great day everyone! xo

Monday, February 24, 2014

Charm Pack Cherry Quilt

Good morning my fine friends! Today is Charm Pack Cherry Day here at PamKittyMorning!  CHERRIES!!! Doesn't that sound pretty PamKittyish?  

cherry3
 
So what's it all about?  It's about the new free pattern over at the Fat Quarter Shop, and it's called The Charm Pack Cherry Quilt, you can download the free pattern here.

charming charm pack
 
All it takes is two cute charm packs and two coodinating solid charm packs!  When asked what packs I'd like to work with I said I like sewing with friends so the FQS crew sent me Happy-Go-Lucky by Bonnie and Camille and a couple of red charm packs and well, I feel pretty happy-go-lucky to be sewing with two friends!

Charm Pack Cherry
 
I think sewing together with Bonnie and Camille is pretty fun!   The Charm Pack Cherry Quilt goes together fast, making it the perfect go-to pattern for a gift, or  JUST FOR YOURSELF. (mine was quilted by another friend Diana)

Charm Pack Cherry
 
One of the fun parts of this project is (driving it around town.. no just kidding, although it is fun) is taking your left over cherry patches and using them for the backing.  I made two checkerboard segments, added some Pam Kitty Picnic  green  strips, to make two panels and then added some Happy-Go-Lucky green floral to the mix.  Top it off with some Pam Kitty Love green and pink binding and I think it worked out rather nice!

Charm Pack Cherry
 
Hop on over to the Jolly Jabber to read all about the Charm Pack Cherry quilts that were made just for this event!!!

AllQuilts
 
Even more fun, check out this great video!!! Do you know there's plenty of great content over at the Fat Quarter Shop Channel????  


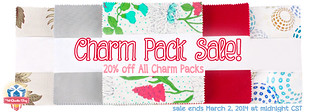
To celebrate this new pattern and video tutorial, Charm Packs are on sale till March 2nd! 

CP-Sale2

Just click HERE and find some charm packs and get started!

Thanks for including me Fat Quarter Shop.  Now go have a great day peoples! xo


Thursday, February 20, 2014

Blue Skies

Yesterday I spent the day in Pacific Grove and it was lovely.  I have been wanting to go to the Monarch Butterfly Sanctuary.  It's off season for them, but there were still plenty there to see. 

Monarch Santuary
 
You can just look up and see them fluttering by, not easy to capture on camera for sure.  On the less sunny side of the sanctuary, you can see them hanging in the trees warming up.  If you look closely in these pictures you can see clumps of butterflies, their wings closed, looking like dry leaves  It's really an amazing site. 

Monarch Santuary

Monarch Santuary

Monarch Santuary

I hesitate to say it was cold, since I think it was 60 degrees, but the wind over the water was pretty brisk.  Lots of birds were sunning themselves on the rocks and in the parking area.  I was afraid to move my car, it had kind of a Hitchcock feeling to it, you know, when they drive out of town? Yikes!

Pacific Grove

Pacific Grove
 
No trip is complete without a drive by the Butterfly House.

Pacific Grove Butterfly house
 
It was a good day.  Luckily it's less than 2 hours to Pacific Grove so you can have a mini vacation at the drop of a hat. But it's back to work today, which is good, because time is flying by!  Have a good weekend people!!!

Wednesday, February 19, 2014

Wednesday

Good morning! As it turned out yesterday, I ended up staying home.  Holly had a friend coming over to help her unpack and you know me, I'm a huge distraction, a bad influence! So come Thursday morning I'll head back over there to get back to work. 

swap block
Back at the ranch here, I managed to get a few things done, including my cute block for the Sew Sweet Block Exchange.  Clara asked for a log cabin in blue and low volume whites.  Coincidentally,  at our sewing day Saturday, Alex was talking about a Skype chat with Cheryl Arkinson that you can listen to here. (part 1)  She shared a bit about her (part 2) discussion on low volume fabrics that I'm anxious to listen to. I'm very interested to hear more, as the terminology evolves with new people and new perspectives. I'm really curious about how a low volume relates to other terminologies.  Whatever you call them, I like them!
What's on your agenda today people?

Tuesday, February 18, 2014

Tuesday!

Hi there, how was your three day weekend?  I had the best time, Saturday was my sew day with the Debbies, this time joined by Deanna, Danelle and Alex.    Debbie let me in the door at 10am and I was totally The Thing That Wouldn't Leave.. leaving at 7pm.  GO HOME PAM.

GROUP1

Debbie was working on a quilt for one of the grandkids, Deb was working on her baskets from the class we all took in OCTOBER.  She totally shamed me. Her basket handles are hand appliqued even.  I didn't even prep my own handles for pete's sake.  Alex and Laura did them for me.   No excuses I guess.   Alex was taking the papers out of her  great quilt you can see here on Facebook. Danelle worked on some hand binding and Deanna marked her quarter inch marks on some pretty St. Patrick's Day Lemoyne stars.   I finished all my flag blocks except one that was missing a piece.  Evidence to be supplied at a later date.
 
FAMOUSDEB
 
As usual there's just never enough food to go around.

Sewingdayfood
 
Deanna brought us homemade heart shaped fudge that was delicious.  I hid mine in my sewing room and ate it while watching tv and working. It was awesome. Danelle brought us each an adorable Valentine.  They're a thoughtful mother-daughter duo!

GROUP
 
Monday I headed to the studio, and I'm back there today, it's that time of year!  Exciting for me, but a bit boring on the blog. You can catch little updates over on my instagram. I'll be there quite a bit this week, so the pickings will be slim around here.  Hope you all have a great week! xop


Friday, February 14, 2014

Valentine's Day

Good morning Valentines! 

Valentine Hot dog
 
 
Hope you'll be mine!!
 
 
xop

Thursday, February 13, 2014

Blogger's Bundle

Good morning!  I have some super-fun news to share this morning!  Donna from Donna's Lavender Nest has asked me to put together a Blogger's Bundle.  And here's my bundle all laid out with her pretty vintage Singer machine!


Pam kitty bloggers choice
One of the things that I love about working with Holly is that she works on making sure that not only do all the pieces in our collections work together, but they also work with other pieces in your stash, and for shop owners, in your store. We have focus pieces, but we also have  companion pieces, and they are perfect companions for your shop/stash even if the focus prints are gone.  So, for my bundle I've added some pieces that aren't Pam Kitty Picnic just to illustrate that! 
If you would like to win this cute bundle of fabric goodness, hop on over to Donna's website and  sign up for her newsletter, then leave her a comment on her blog so she knows you've signed up!  Already on her list? Leave her a comment telling her!  It's just that easy! I hope you take some time to shop around Donna's too, she has a nice collection of wonderful fabrics, notions and trims just waiting for you! Don't forget to check out her selection of vintage fabrics as well!!!

Donna will be  drawing  a name next week on Thursday 2/20  so head over and sign up!
Ok, that's it for me today! xo

Wednesday, February 12, 2014

Wednesday

Good morning.. how is the week going for you? I've just been perking along here doing the usual. Which isn't much to be honest! I have my swap stuff together so I can start cutting on my block.  It has been fun to go through my stash looking for treasure.

swapping

Sorry for the slap-dash photography, I just used my point and shoot in the sewing dungeon.  I waited way to late in a already gloomy day to get a photo. I've been working on an idea, but it's just not coming together as I'd hoped.  Back to the drawing board.

playing around
 
Are you up to something interesting at your place?  Tell me all about it!

Monday, February 10, 2014

Hello Tutorial

Hi there, how are you?  Nice rainy weekend here, so I managed to get something done around the house.  Even some sewing related things, which is probably surprising!  Anyway.. today I wanted to talk about making the Hello Pillow.. I don't have a fancy pattern, but I have a download of the "hello" for you, and I think that's probably the part everyone is interested in!

Hello

To get started my pillow form was a travel pillow from Target that is 14" x 20".  It's a lot softer and squishier than my normal pillows and I think that it's because it's for sleeping, and not for being adorable in your pillow vault. (WHAT??!! You use your pillows and don't store them in a Pillow Repository? SHOCKING!)  There's several sizes of rectangular pillow forms out there, and you can adjust the 'hello' for your size pillow.   You don't have to use a rectangular pillow either!  You can check out pillows on my Hello Pillow Pinterest Board to see all kinds of options.
 
So back to getting started, you cut your pillow front fabric the EXACT same size as your pillow form. This will give you a nice firm pillow.   Next up, print this Hello PDF...the hello has already been reversed for tracing onto fusible web.  Trace on to fusible web and fuse to your word fabric. Carefully cut it out and fuse it to the pillow fabric.  I eye balled the placement then used a ruler to make sure it was straight on my fabric.  It's about 3" from the bottom and 2 1/2" from the right hand side.  I like the right justification here. 
 
Fuse it and blanket stitch the edges.  I love blanket stitching and could do it all day. But if you don' t have blanket stitching capabilities on your machine or you like straight stitching better, go for it. 
 

hello pillow close up


Next up, machine quilt the background.  I outlined the letters then stitched a 1" grid.  I love the texture. Plus, I think the three layers, top, batting and backing, make for  a sturdier pillow. 

Once that's done it's smooth sailing.  For my 14" x 20" inch pillow front, I used two 14" x 24" pieces for the envelope back.  I folded each piece in half so that it was 14" x 12" inches and basted them to the back with the folded edge in the center, overlapping to cover the pillow form.  Then I used two pieces of 2 1/4" x width of fabric strips to make binding and bound the edge.  Hand stitch and you have a pillow my friends. 


hello pillow

Now wouldn't a Love pillow be cute this week?


P. S.  Elizabeth wrote a whole book about words on quilts and you can find it here!

Thursday, February 06, 2014

Hello Thursday

Hi there how are you?  I managed to finish that hello pillow  yesterday late, and this is photo proof.  I made a simple envelope back for it. I love the look of the covered buttons I used to use but it turns out I'm lazy. I won't even bother giving you the excuse that the buttons might hurt if you leaned against them, even though that does sound kind of legit, right?


Hello
 
I'm a little bummed, my pillow, an alleged 14" x 20" travel pillow from Target, isn't really 14" x 20". It doesn't fill up this pillow cover at all, and it's 13.5" x 19.5", but then it's for sleeping and not for being cute.  I like my pillows to be nice and tight, a tip I learned from Elizabeth.  It's pretty easy to make, and I'll work on a little tutorial in the next few days.  In the mean time, get inspired for your own Hello Pillow here.   You can read about Bari's pillows here, and Amy Ellis is hosting the Pillow Collective here. And be sure and hop on over to Amy Smart's, she's got a darling Valentine's Day tutorial, along with a lot of other great pillow tutorials!
 
Ok, that's it for me today! Hope you have a great day, and if I don't get back here tomorrow, have a great weekend! xo


Wednesday, February 05, 2014

Wednesday

Wow we're back on our regular schedule! That evening posting just seems weird, we get together over coffee right?  My coffee is sitting there on a chair covered in frost, not sure you can  tell from the picture, but there's a tiny ring at the bottom of the cup where the frost is melting away.  The whole yard was sparkling.  Ok sure, it's not snow but pretty chilly for here! Especially lately!

coffee
 
The banner swap isn't the only swap I'm involved with this year!  I want to do more sewing  and different kinds of things, and when Donna asked me if I'd like to participate in her Sew Sweet Bee, I said sure!  Luckily it's a pieced block swap, so I should be able to handle it!  Donna chose the Jacob's Ladder block and you can see the first one she received from Renee here!

bee block
 
Of course already I can see I'm not the coolest swapper ever, look at all the little goodies that came with Renee's package! Next month were' sending log cabin blocks to Clara at Clover and Violet! I can't wait to pull out some fabrics and get busy.
 
I have a sew day coming up with the Debbies so I've been getting a kit together to work on.  I'm making Minnick and Simpson's Liberty Road. It's a great flag quilt, and I'm using the layout I photoshopped and shared here. And I haven't forgotten about the hello project.. don't worry.  
 
Now tell me, what are you up to?

Monday, February 03, 2014

Be Mine Valentine!

Hi there!  You're here at the "i"  on the Be Mine Banner Swap Blog Hop!   I was so exited to be included in this great swap. You can find links to all the instructions at the end of this post!

Now to get started I have a pdf that you can download here!  It has your triangle shapes, as well as the letter "i" already reversed for tracing onto fusible web.  Print that out and lets get started!  (be sure and set your printer to scale and not fit the page.  Your outer banner triangle should be 6 inches wide at the top and 8 1/2 inches long to the point.)

You will need the following:
(1) 9" x 7" linen white felt
(1) 9" x 7" pink fabric
(1) 2" x wof  strip for ruffle cut with a pinking edge rotary cutter
(1) 1 1/2" x wof strip for ruffle cut with a pinking edge rotary cutter
(1) 9" x 7" fusible web
(1) 2"x 3" fusible web
(1) 2" x 3" red for letter i.
(1) large and (1) small red heart button
7" pink mini rick rack
(2) 10" medium pink rick rack
(2) 10" red ribbon

Please note, if you don't have decorative shears of rotary cutting blades, straight cuts will be just fine!

Cut out your felt using a decorative rotary cutter OR decorative shears. Trace your smaller banner piece and letter "i" onto fusible web. Fuse to the respective fabric pieces and cut out.
 
Fuse your pink banner centering it on the  felt piece.

Valentine's banner
 
Fuse your "i"  in place low on the pink inner banner piece about 1 1/2 inches from the tip. Machine blanket stitch the pink banner piece and the letter "i". If you don't have blanket stitch capability on your machine you can straight stitch around the edges or stitch by hand! Be a rebel, it's a banner, you don' t even have to stitch if you don't want to!
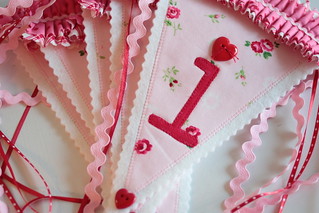
Be Mine banner swap

Center you smaller ruffle strip onto the larger ruffle strip and press.  This will help those pieces stay together while you stitch them together down the center with your ruffler  foot.  I set mine on 6.  If you don't have a ruffler  foot you can run a basting stitch down the center and pull up your stitches till you get your desired amount of ruffle.  Need help with your ruffler foot?  Head over HERE to the Quilt Show and watch Alex demonstrate. (you can become a free member of The Quilt Show and see this video plus lots of fun free content)

Stitch your ruffle  along the top of the banner piece centering your ruffled stitch line on the top of the pink banner piece.  Your ruffle should show about 3/4 of an inch above the felt piece. Trim the side edges even with the banner side edge, using decorative shears or rotary cutter.  Topstitch mini rick rack on the stitching line.

I tied my buttons on with a knot leaving ties  using red Aurifil 30wt thread.  You could also use embroidery thread or perle cotton. I hand stitched ribbon and rick rack ties to the back of the banner. But those eyelets that others have used look like the best idea ever!
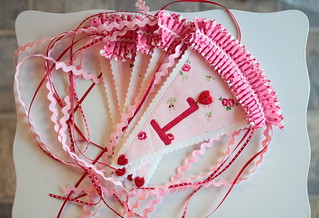

Valentine's banner
 
 Here's a picture of the full banner taken by Roseann!!!  It's adorable, right? 
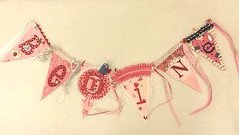
 

Be Mine Banner

And here's mine at my house! So cheerful!
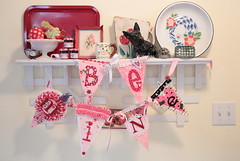
 
Be Mine

Here's the list of swappers, where you can find instruction on how to make each of the of the letter's in "Be Mine". 
 
I: That's me!
E: Pat
 
 Hope you enjoyed all the great tutorials! xo


Newer›  ‹Older